A hands-on IaC walkthrough using VS Code and Bicep to build a secure, highly available Azure environment.
Scalable cloud environments are not built by chance. They are designed deliberately, with network isolation, availability, security controls, and automation embedded from the very beginning.
Many Azure beginners rely heavily on portal clicks to deploy virtual machines and networking components. While this approach works for learning, it does not scale. Manual deployments are difficult to reproduce, error-prone, and almost impossible to govern consistently across multiple environments.
This hands-on lab demonstrates how a production-ready Azure environment can be deployed using Bicep, Microsoft’s native Infrastructure as Code language. Instead of manually configuring resources, the entire environment is defined as code, ensuring repeatability, consistency, auditability, and governance.
If you’re new to secure-by-design infrastructure, you may also want to review
👉 building secure Azure environments with Bicep
to understand how security is embedded early in Azure architectures.
The walkthrough focuses on deploying Linux virtual machines, securing them with Network Security Groups (NSGs), distributing traffic using an Azure Load Balancer, and applying a tagging strategy that supports visibility and cost management.
🎥 Video Walkthrough
Who This Lab Is For
This lab is designed for:
-
Azure beginners transitioning from portal-based deployments
-
Junior cloud engineers learning Infrastructure as Code
-
Anyone preparing for AZ-104 or real-world Azure engineering roles
-
Engineers who want to understand why Azure architectures are designed this way, not just how to deploy them
No prior Bicep experience is required, but basic Azure networking concepts will be helpful. If you need a refresher, see
👉 setting up clean Azure VNets and subnets.
Why Use Bicep for Azure Deployments?
Bicep is a domain-specific language (DSL) built by Microsoft to simplify Azure Resource Manager (ARM) deployments. It provides a cleaner, more readable syntax while compiling directly to ARM templates.
Using Bicep in this lab offers several real-world advantages:
-
Declarative infrastructure: You describe the desired state, not procedural steps
-
Repeatable deployments: The same template can be reused across environments
-
Version control: Infrastructure changes can be tracked and reviewed in Git
-
Consistency: Eliminates configuration drift caused by manual changes
-
Native Azure integration: No external tooling required
If you want to go deeper into automation patterns, see
👉 Automating Azure infrastructure with Bicep.
Lab Objectives
By the end of this lab, you will be able to:
-
Deploy Linux virtual machines using Bicep
-
Design a clean Azure VNet with multiple subnets
-
Secure workloads using Network Security Groups
-
Implement high availability with an Availability Set
-
Configure an Azure Load Balancer for traffic distribution
-
Apply consistent tagging for governance and cost control
Lab Architecture Overview
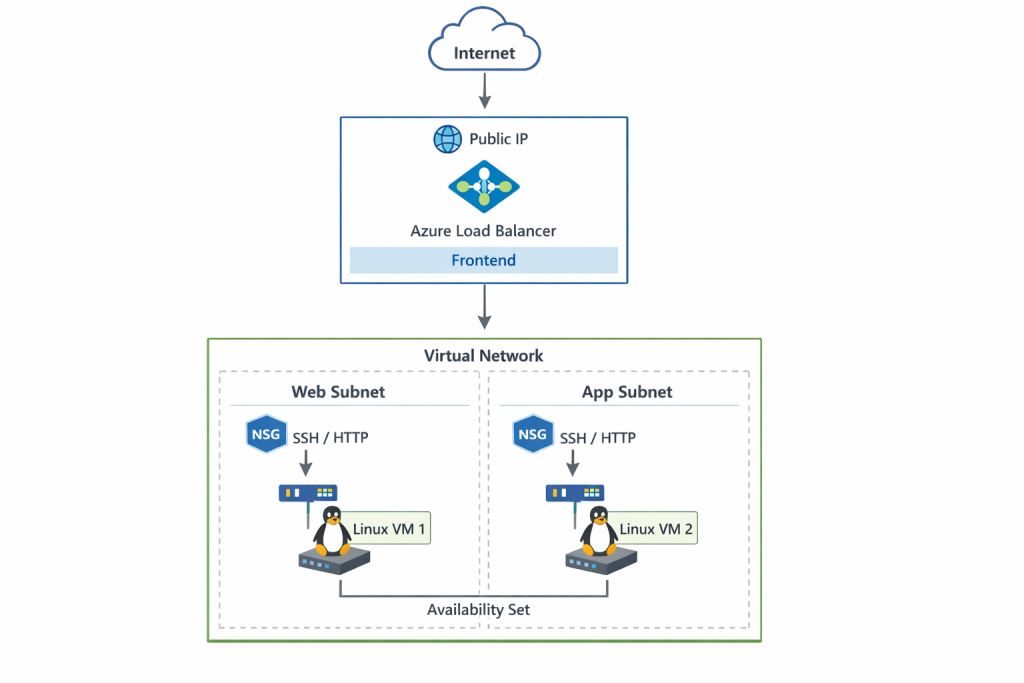
This lab deploys a simple but production-aligned architecture that demonstrates key Azure design principles.
The environment includes:
-
One resource group
-
One virtual network (VNet)
-
Two subnets (one per VM)
-
Two Linux virtual machines (Standard_B2s)
-
Network Security Groups applied at the subnet level
-
One Availability Set
-
One Azure Load Balancer (Layer 4)
This architecture builds directly on Azure networking fundamentals, which are explored in more depth in
👉 Azure networking fundamentals with VNets and subnets.
Traffic flow follows a clean and predictable pattern:
Internet → Azure Load Balancer → Backend VMs
Each component plays a specific role in availability, security, and scalability.
Resource Group and Network Design
A dedicated resource group is used to logically group all compute and networking resources. This provides several benefits:
-
Simplified lifecycle management (deploy, update, delete)
-
Easier cost tracking
-
Clear ownership boundaries
Virtual Network Design
The virtual network was designed with non-overlapping address spaces, ensuring:
-
Clean IP segmentation
-
Future scalability
-
Compatibility with hybrid connectivity if required later
Subnet Separation
Each virtual machine is deployed into its own subnet. While this is not always required, it allows:
-
Independent security policies per workload
-
Clear separation of responsibilities
-
Easier troubleshooting and auditing
This design mirrors enterprise environments where workloads are rarely placed into a single flat subnet.
Deploy Linux Virtual Machines with Bicep
Two Linux virtual machines are deployed using the Standard_B2s SKU, which provides a cost-effective balance of CPU and memory for lab environments.
Each VM is:
-
Deployed using Bicep for consistency
-
Placed in its own subnet
-
Associated with a dedicated network interface (NIC)
-
Protected by subnet-level Network Security Groups
Using Infrastructure as Code ensures both VMs are deployed identically, eliminating configuration drift and human error.
In production environments, VM consistency is often enforced using custom images. For that workflow, see
👉 Building reusable VM images in Azure using Compute Gallery.
Network Security Groups (NSGs)
Security is enforced using Network Security Groups applied at the subnet level.
Rather than attaching NSGs directly to NICs, subnet-level enforcement provides:
-
Centralized security management
-
Fewer rule duplications
-
Easier auditing and troubleshooting
Inbound Rules
The following inbound rules are configured:
-
SSH (Port 22) – Used for secure administrative access
-
HTTP (Port 80) – Used to test load-balanced traffic
All other inbound traffic is denied by default, following the principle of least privilege.
For a broader governance view, including policy enforcement and resource protection, see
👉 Azure governance with policies, tags, and resource locks.
Availability Set Configuration
To improve availability, both virtual machines are deployed into an Availability Set.
An Availability Set distributes VMs across:
-
Fault domains: Protects against hardware failures
-
Update domains: Protects against planned Azure maintenance
This ensures that both VMs are not impacted simultaneously by maintenance events or infrastructure failures.
While newer workloads often use Virtual Machine Scale Sets (VMSS), Availability Sets are still widely used and remain relevant for many production scenarios.
Azure Load Balancer Setup
What is Azure Load Balancer?
Azure Load Balancer is a Layer 4 (TCP/UDP) service that distributes inbound traffic across backend resources to improve availability and performance.
Unlike Application Gateway, Azure Load Balancer operates at the transport layer and does not inspect HTTP headers or content.
If you’re interested in higher-level traffic management and auto-scaling, see
👉 Advanced Azure load balancing and scaling patterns.
Configuration Overview
The following steps were performed:
-
Public IPs were removed from individual VMs
-
A frontend IP configuration was created on the load balancer
-
Both VMs were added to the backend pool
-
A health probe was defined to monitor VM availability
-
Inbound NAT rules were configured for SSH access using custom ports
This design ensures that:
-
Traffic is evenly distributed across both VMs
-
Backend VMs are not directly exposed to the internet
-
Administrative access remains secure and controlled
Tagging Strategy for Governance and Cost Control
Consistent tagging was applied automatically using Bicep.
The following tags were included:
-
Environment
-
Owner
-
Project
-
Cost model
Tagging plays a critical role in real-world Azure environments by enabling:
-
Accurate cost allocation
-
Resource ownership tracking
-
Policy enforcement
-
Easier automation and reporting
Applying tags through code ensures that governance standards are enforced from day one.
Tagging enables accurate cost reporting, policy enforcement, and long-term manageability. This ties directly into
👉 How Azure Policy and tagging enforce governance.
Validation and Testing
After deployment, the environment can be validated by:
-
Accessing the load balancer public IP via a browser
-
Confirming traffic is distributed across both VMs
-
Verifying SSH access through configured NAT rules
-
Reviewing resource tags in the Azure Portal
Successful validation confirms that the infrastructure is functioning as designed.
For production readiness, monitoring is essential. See
👉 monitoring Azure infrastructure with Azure Monitor alerts and action groups.
Key Takeaway
Infrastructure as Code enables teams to deploy secure, scalable, and repeatable Azure environments.
By combining Bicep with sound network design, subnet-level security, availability sets, and load balancing, this lab demonstrates how production-ready architectures can be built efficiently without sacrificing control or visibility.
This approach scales naturally to more advanced patterns such as:
-
Virtual Machine Scale Sets
-
Application Gateway
-
Private Endpoints
-
CI/CD-driven infrastructure deployments
Discover more from Humble Cloud Tech
Subscribe to get the latest posts sent to your email.