A Practical Lab Guide from Beginner to Pro.
Behind every secure, reliable, and scalable Azure environment is a well-designed network foundation.
Azure networking is often underestimated by beginners. Many rush straight into deploying virtual machines or applications without understanding how traffic flows, how IP addressing works, or how governance is enforced. This usually leads to environments that work “for now” but break under scale, fail security reviews, or require costly redesigns later.
Azure Virtual Network (VNet) enables secure communication between Azure resources, provides controlled internet access, and supports hybrid connectivity to on-premises environments. Poor planning at this layer often results in IP exhaustion, security gaps, routing issues, and governance blind spots.
In this hands-on lab, you’ll learn how to design and deploy a clean Azure VNet, structure subnets correctly, and apply resource tagging for governance and cost management, the same way it’s done in real enterprise environments.
This guide is written as an evergreen reference. You can come back to it whenever you design a new Azure environment, whether for labs, production workloads, or certification preparation.
Lab Objectives
By the end of this lab, you will be able to:
-
Plan an Azure VNet IP address space correctly
-
Create a Virtual Network using the Azure portal.
-
Design logical subnets for different workloads
-
Apply consistent Azure resource tagging
-
Understand real-world production vs lab design differences
-
Avoid common subnetting and governance mistakes
-
Verify connectivity and configuration after deployment
What Are Azure VNets and Subnets?
Before touching the Azure Portal, it’s important to understand what you are actually building and why these components exist.
Azure Virtual Network (VNet)
An Azure Virtual Network (VNet) is a logically isolated private network in Azure. It functions similarly to a traditional on-premises network, but without the physical hardware.
A VNet allows Azure resources to:
-
Communicate securely with each other
-
Access the internet (when allowed)
-
Connect to on-premises networks using VPN or ExpressRoute
-
Peer with other VNets
A VNet is the top-level boundary for networking in Azure. Everything else, like subnets, routing, and security rules, exists inside it.
Key characteristics of a VNet:
-
Uses private IP addressing (RFC 1918 ranges)
-
Scoped to a single Azure region
-
Fully isolated unless explicitly connected to other networks
Azure Subnets
Subnets divide a VNet into logical network segments. Each subnet:
-
Has its own CIDR address range
-
Hosts specific workloads
-
Acts as a security and routing boundary
Subnets are where real design decisions happen. They influence:
-
Security isolation
-
Network traffic flow
-
Scalability
-
Cost and governance
A subnet should always represent a clear purpose, not just an IP range.
Why Subnet Design Matters
Subnet design is not about “making things work.” It is about making things sustainable.
A well-designed subnet strategy:
-
Keeps traffic organized and predictable
-
Improves security boundaries
-
Simplifies scaling and future expansion
-
Reduces the need for redesigns
A poorly designed subnet strategy leads to:
-
IP exhaustion
-
Over-permissive security rules
-
Complicated routing
-
Downtime during growth
In production environments, subnet mistakes are expensive, not just financially, but operationally.
Real-World Perspective: Lab vs Production
Lab environments often:
-
Use a single VNet
-
Have few subnets
-
Ignore long-term growth
Production environments must:
-
Support scaling and future services
-
Integrate with identity, security, and monitoring
-
Pass audits and governance checks
-
Support hybrid and multi-region designs
This lab teaches you patterns that scale beyond learning exercises.
Step-by-Step Lab: Deploying a Clean Azure Network
Step 1: Plan Your IP Address Space
Before creating anything, plan your address space carefully.
Example VNet CIDR
10.0.0.0/16 This provides 65,536 IP addresses, allowing room for growth.
Best Practices for IP Planning
- Use private, non-overlapping IP ranges
- Avoid conflicts with on-prem networks
- Leave space for future growth, peering, and hybrid connectivity
- Reserve smaller prefixes (e.g. /24) for your VNet address space; reserve those for subnets
- Plan for peering, VPN, or ExpressRoute early
Important:
Changing a VNet address space later is possible but disruptive. Good planning avoids outages and rework.
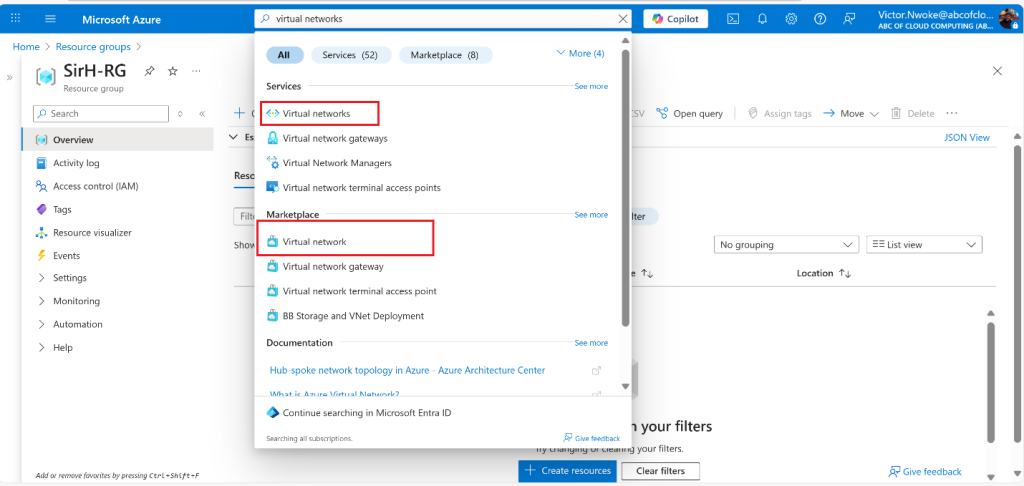
Step 2: Create a virtual network (VNet) with subnets using the portal
- Sign in to the Azure portal: https://portal.azure.com
- Search for and select Virtual Networks
- Select Create on the Virtual networks page.
- Complete the Basics tab:
- Subscription, Resource Group, VNet Name, Region


Best Practice – Naming Convention (Recommended)
Use names that clearly reflect environment and purpose.
Recommended format:
[environment]-[service]-vnetExample:
prod-infra-vnetClear naming improves:
-
Readability
-
Automation
-
Troubleshooting
-
Governance reporting
Step 3: Configure Subnets
Navigate to the IP Addresses tab during VNet creation.
Select + Add a subnet or Edit Default Subnet. Complete the name and address information for each subnet.

Here, you will divide the VNet address space into subnets based on workload type or security requirements.
Example Subnet Design
| Subnet Name | Address Prefix | Purpose |
|---|---|---|
| web-subnet | 10.0.1.0/24 | Web servers |
| app-subnet | 10.0.2.0/24 | Application layer |
| db-subnet | 10.0.3.0/24 | Databases |
Key Design Principles
-
One workload type per subnet
-
Never mix application tiers in one subnet
-
Leave unused IP space for expansion
-
Keep subnet purpose clear and documented
This structure aligns with three-tier architecture, a common enterprise pattern.
Click Review + Create, validate, and deploy.

Step 4: Apply Resource Tagging
Azure tags are key-value pairs applied to resources.
You can apply tags:
-
During resource creation
-
After deployment
Common Enterprise Tags
| Key | Example Value |
|---|---|
| Environment | Production |
| Owner | IT |
| CostCenter | 1001 |
| Project | Network-Foundation |


Why Tagging Is Critical in Azure
Tagging is not optional in real environments.
Tags enable:
-
Cost tracking and chargeback
-
Ownership clarity
-
Governance and compliance
-
Automation and reporting
Without consistent tagging:
-
Costs become invisible
-
Resources lose ownership
-
Cleanup becomes difficult
Many organizations enforce tagging using Azure Policy to prevent untagged resources.
Cost Implications of Subnet and Network Design
Networking design directly affects Azure costs.
Examples:
-
Poor subnet planning may force redeployment of services
-
Over-segmentation increases management overhead
-
Incorrect routing can increase data transfer costs
Tagging allows you to:
-
Identify expensive workloads
-
Track environment-specific spending
-
Optimize resource usage
Good design reduces long-term operational cost, not just technical complexity.
Common Mistakes to Avoid
1. Using One Large Subnet for Everything: This removes security boundaries and complicates scaling.
2. Running Out of IP Addresses: Small subnets fill up quickly, especially with platform-reserved IPs.
3. Ignoring Future Connectivity: Hybrid and peering scenarios require address planning from day one.
4. No Tagging Strategy: Untracked resources lead to wasted spending and governance failures.
Verification Steps: Confirm Your Network Works
After deployment, always verify configuration.
What to Check
-
Subnet address ranges are correct
-
Resources are placed in the correct subnet
-
Tags are applied consistently
-
No overlapping IP ranges exist
Connectivity Verification (Basic)
-
Deploy two test VMs in different subnets
-
Confirm they can communicate if expected
-
Verify isolation where required
Verification ensures your design matches intent, not just configuration.
Key Takeaway
Smart Azure networking is not just a technical task; it is foundational architecture.
Well-planned VNets, logical subnetting, and consistent tagging ensure:
-
Scalability
-
Security
-
Cost control
-
Long-term maintainability
Design it right from day one, and every service built on top becomes easier, safer, and cheaper to operate.
Discover more from Humble Cloud Tech
Subscribe to get the latest posts sent to your email.