Deploying VNets, VMs, IAM, Policies, Monitoring, and Governance using Infrastructure as Code.
Manual infrastructure deployment does not scale in modern cloud environments. It’s not just about speed—it’s about consistency, security, and repeatability. When environments are built through one-off portal clicks, teams eventually hit the same problems:
-
Configuration drift: “Dev” and “Prod” stop matching over time.
-
Security gaps: controls get applied inconsistently (or forgotten entirely).
-
Slow change reviews: you can’t easily code review portal changes.
-
Harder governance: tagging, policy enforcement, and access control become unreliable.
Infrastructure as Code (IaC) solves this by making infrastructure declarative, version-controlled, and reproducible. In this lab, we’ll deploy a complete Azure foundation using Bicep inside Visual Studio Code, covering networking, compute, identity & access control, governance, and monitoring all through code.
Tip: Bicep is Microsoft’s recommended IaC language for Azure resource deployments. Bicep compiles to ARM templates behind the scenes, but the authoring experience is cleaner and more maintainable than raw JSON.
🎥 Video Walkthrough
What You’ll Build
This lab deploys a practical baseline environment you can reuse for real projects:
-
Resource Group to contain the environment
-
Virtual Network (VNet) and Subnets
-
Network Security Groups (NSGs) with controlled inbound rules
-
Network Interfaces
-
Windows and/or Linux Virtual Machine(s)
-
Storage Account (example of a managed PaaS resource)
-
Monitoring hooks (Log Analytics/Azure Monitor foundations)
-
Tagging strategy applied consistently via parameters
-
Governance & compliance checks via Azure Policy
-
Identity & access control via Microsoft Entra ID roles and least privilege
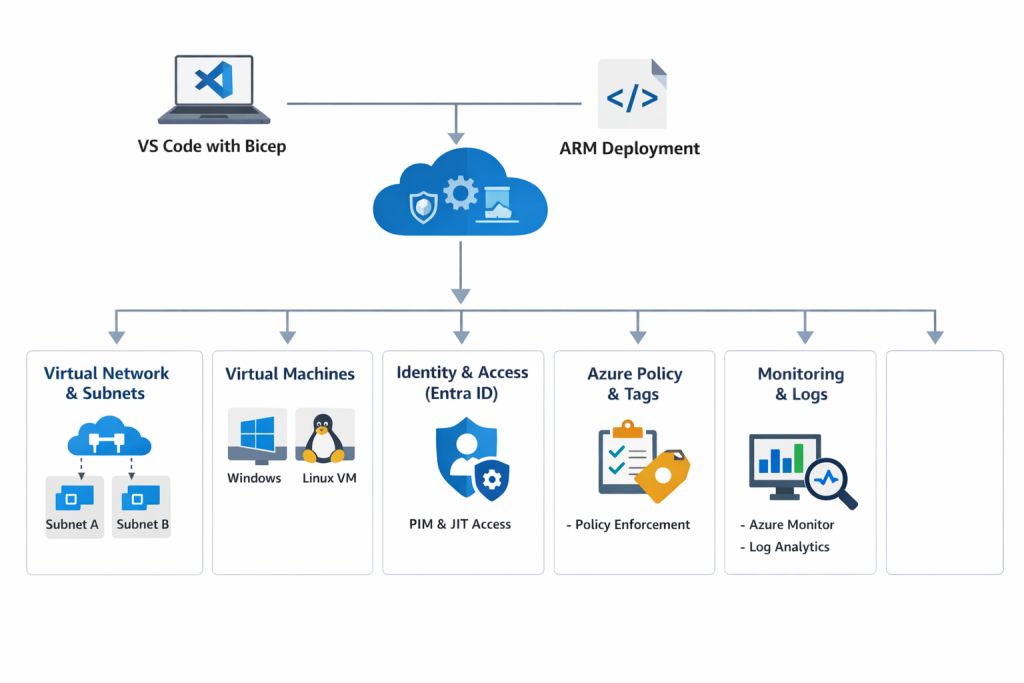
Architecture Diagram
If you want to strengthen your foundation before automating it, link this naturally in your intro section:
Setting Up Clean Azure VNets, Subnets & Tagging
Lab Objectives
By the end of this lab, you will be able to:
-
Set up a local Azure IaC development environment
-
Deploy Azure infrastructure using Bicep
-
Implement identity and access control with Microsoft Entra ID
-
Enforce governance with Azure Policy
-
Apply consistent tagging across resources
-
Validate deployments using the Azure Portal and Azure CLI
-
Understand the “enterprise workflow” mindset for repeatable provisioning
Lab Prerequisites
-
An Azure subscription
-
Azure CLI installed
-
Visual Studio Code
-
VS Code extensions:
-
Azure Account
-
Bicep
-
ARM Template Viewer (optional, helpful for learning output ARM)
-
Part 1: Set Up Your IaC Development Environment
1) Install VS Code + Extensions
Install Visual Studio Code and add the extensions listed above. The Bicep extension gives you:
-
syntax highlighting
-
linting
-
autocomplete
-
template validation
-
quick fixes
2) Authenticate to Azure
Open a terminal and run:
az login
az account show
If you manage multiple subscriptions, explicitly set the right one:
az account set --subscription "<SUBSCRIPTION_ID_OR_NAME>" Part 2: Create the Resource Group
Resource Groups are more than a “folder”; they’re also a lifecycle boundary (deploy, manage, and delete together).
az group create \
--name rg-iac-lab \
--location eastus
Part 3: Write and Deploy Bicep Templates
Recommended folder structure (simple but scalable)
Even for a lab, structure matters. A clean layout makes it easier to expand later:
-
main.bicep(orchestration entry point) -
modules/(network, compute, monitoring, storage) -
parameters/(optional: .json parameter files)
Example:
iac-lab/
  main.bicep
  modules/
    network.bicep
    compute.bicep
    monitoring.bicep
    storage.bicep
  parameters/
    dev.parameters.json
What your Bicep deploys
In your environment, you created Bicep for:
-
Virtual Networks & Subnets
-
NSGs
-
NICs
-
Windows & Linux VMs
-
Storage Accounts
-
Azure Monitor foundations
-
Automatic tagging
A practical approach is:
-
Put shared values in parameters (location, environment, owner, cost center).
-
Pass tags as an object so every module receives the same tagging block
Why this matters: tagging is one of the easiest ways to improve governance, cost tracking, and operational clarity.
To go deeper on governance controls, Azure Policy, Tags, and Resource Locks Explained: A Complete Governance Guide for Cloud Engineers
Deploy using:
 az deployment group create \
  --resource-group rg-iac-lab \
  --template-file main.bicep
Part 4: Identity & Access Management (IAM) with Microsoft Entra ID
Infrastructure automation is only “production-ready” when access is controlled correctly. In this lab, you used Microsoft Entra ID to:
-
manage users and groups
-
enable Privileged Identity Management (PIM)
-
use Just-In-Time (JIT) activation for elevated permissions
-
verify role activation in the Azure Portal
Why JIT/PIM matters: it reduces standing privilege. Instead of leaving “Contributor” active permanently, it’s activated only when needed, for a limited time.
If you also manage app deployments, check out Azure Web App Zero-Downtime Deployment: A Hands-On Guide to Deployment Slots, Auto Scaling, and Load Testing
Part 5: Governance with Azure Policy (and why it’s a must)
Azure Policy is how organizations enforce standards at scale. Even if your Bicep template includes tags and best practices, policy ensures that:
-
resources can’t be created without required tags
-
insecure SKUs can be restricted
-
regions can be limited
-
configurations can be audited continuously
In this lab, your validation included reviewing policy compliance status. That’s exactly the right habit—because the real question isn’t “Did it deploy?” It’s:
“Did it deploy and meet the standards we must enforce every time?”
To deepen your understanding on Azure Policy, check out Azure Policy, Tags, and Resource Locks Explained: A Complete Governance Guide for Cloud Engineers
Part 6: Monitoring and Validation (what to check after deployment)
Once deployment completes, don’t stop at the success message. Validate what matters operationally:
1) Confirm resources exist and are healthy
-
Resource Group contains expected resources
-
VM provisioning state is “Succeeded”
-
NIC attached and IP configuration correct
2) Verify tags are applied consistently
Pick a resource and confirm tags are present and correct. Consistency is the goal.
3) Check policy compliance
Navigate to Azure Policy → Compliance and confirm:
-
assignments are in effect
-
non-compliant resources are visible
-
remediation is possible (where applicable)
4) Confirm identity behavior
If you’re using PIM/JIT:
-
activate role
-
confirm permissions work only while active
-
confirm permissions drop when the activation ends
To level up monitoring as a real skill, check out How to Set Up Azure Monitor Alerts, Action Groups, and Processing Rules (Step-by-Step Guide)
Why Bicep (and when it makes the most sense)
Bicep is a strong fit in Azure-first environments because it offers:
-
Cleaner syntax than raw ARM JSON
-
Faster authoring and iteration (especially with VS Code tooling)
-
Native Azure integration (resource types, API versions, docs)
-
Modular design (reusable modules for network/compute/storage)
If you’re also building larger, multi-layer environments, your readers may like seeing Bicep used across patterns. Link this in your “Next steps” section:
- Build a Secure Azure Environment in Minutes with Bicep: VMs, Networking, Private Endpoints & Blob Replication
- Deploying a Scalable Azure Environment with Bicep: VMs, NSGs, Subnets & Load Balancer (Step-by-Step Lab)
Key Takeaway
Infrastructure as Code is no longer optional in cloud engineering. It’s how teams build environments that are:
-
repeatable across dev/test/prod
-
reviewable through version control
-
governed with consistent standards
-
safer to change over time
This lab demonstrates real-world Azure automation, not just theory, by combining deployment, governance, validation, and identity controls in one workflow.
Recommended Next Labs
To keep learning in a logical sequence, here are the best follow-ups:
-
Networking foundation: Azure Networking with PowerShell: VNet Design, Peering, VM Provisioning & Network Watcher (Beginner to Pro)
-
Storage hardening: Securing Azure Blob Storage with PowerShell: Network Isolation, SAS Access & Immutable Policies (Beginner to Pro)
-
Golden images at scale: Building Golden Images with Azure Compute Gallery: Custom VM Image Creation & Deployment (Hands-On Lab)
-
Monitoring: How to Set Up Azure Monitor Alerts, Action Groups, and Processing Rules (Step-by-Step Guide)
Cleanup
To avoid ongoing cost (especially VMs), remove the resource group when finished:
az group delete --name rg-iac-lab --yes --no-waitDiscover more from Humble Cloud Tech
Subscribe to get the latest posts sent to your email.