A hands-on lab automating secure Azure Blob Storage using VNets, subnets, SAS tokens, and immutability.
Modern cloud storage is no longer just about availability or scalability. In real production environments, storage services must also meet strict security, compliance, and governance requirements. A single misconfiguration, such as leaving a storage endpoint publicly accessible, can expose sensitive data even when authentication is technically “enabled.”
In this hands-on lab, you will build and harden a secure Azure Blob Storage environment using PowerShell automation, following the same patterns used in enterprise Azure deployments. The walkthrough covers secure provisioning, network isolation with VNets and subnets, immutable blob storage policies, and controlled access using time-bound SAS tokens.
This lab is designed to move you from basic storage usage to production-ready Azure storage security, aligning with Zero Trust and defense-in-depth principles.
🎥 Video Walkthrough available for visual reference and validation.
Lab Objectives
By the end of this lab, you will be able to:
-
Create a secure Azure Storage Account using PowerShell
-
Configure private blob containers with no anonymous access
-
Apply immutable blob storage policies for data protection and compliance
-
Restrict storage access to a specific virtual network and subnet
-
Generate and manage Shared Access Signatures (SAS) securely
-
Align Azure Blob Storage with Zero Trust security principles
These objectives reflect real-world responsibilities commonly handled by Azure cloud engineers, platform engineers, and DevOps teams.
What Is Azure Blob Storage?
Azure Blob Storage is Microsoft’s object storage service designed for unstructured data such as:
-
Application data
-
Backups and archives
-
Logs and telemetry
-
Media files (images, video, audio)
Blob Storage is highly scalable and globally accessible by default. However, accessibility without intentional security design becomes a liability.
Scalability is automatic in Azure. Security is not.
Without explicit controls, storage accounts may allow:
-
Public endpoint exposure
-
Broad access via account keys
-
Unlimited data deletion or overwrite
This is why Blob Storage must be actively secured, not merely created.
Why Securing Azure Blob Storage Matters
A secure Azure storage design ensures that:
-
Public access is disabled by default
-
Data retention requirements are enforced
-
Access is time-bound, scoped, and auditable
-
Network traffic flows only from trusted locations
Without these controls, storage accounts become an easy attack surface for data exfiltration, ransomware, or accidental data loss.
In enterprise environments, Blob Storage often contains:
-
Application secrets
-
Customer data
-
Audit logs
-
Compliance records
This makes storage security a governance and risk issue, not just a technical one.
🔗 For a broader governance perspective, see:
Azure Policy, Tags, and Resource Locks Explained: A Complete Governance Guide for Cloud Engineers
Lab Environment Overview
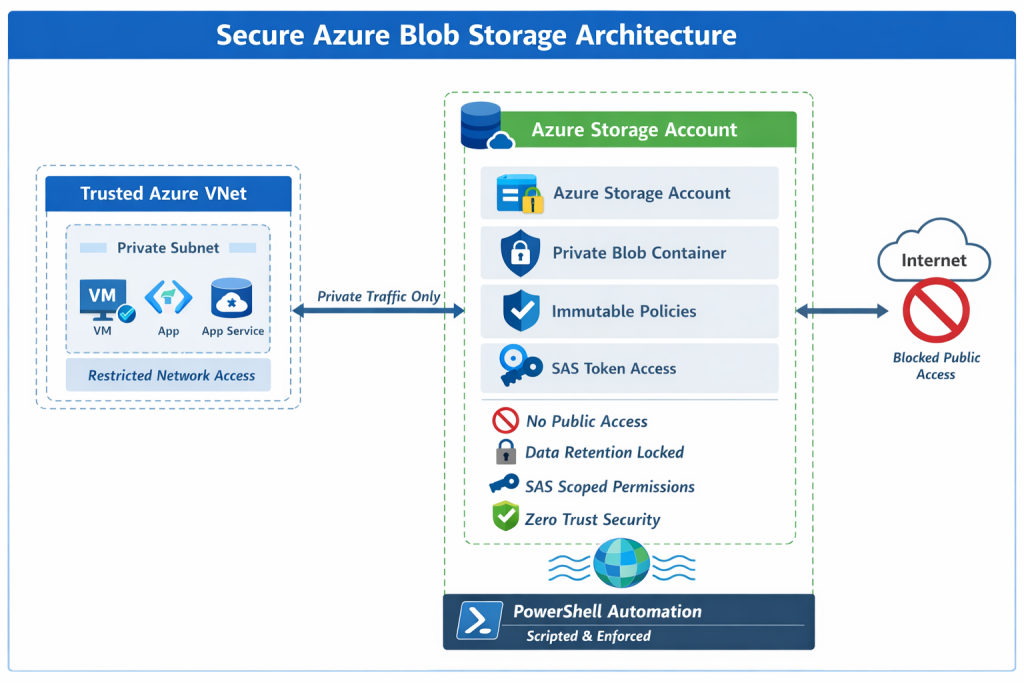
This lab deploys a clean, isolated Azure environment with security controls applied at every layer.
Resources Used
-
One Azure Resource Group
-
One Azure Storage Account (GRS redundancy)
-
One private Blob container
-
One Virtual Network (VNet)
-
One Subnet
-
Network-restricted storage access
-
Immutable blob storage policy
-
SAS-based access control
Each component plays a specific role in enforcing security, compliance, and least privilege.
Step 1: Create the Azure Storage Account (Secure by Default)
The lab begins by provisioning a new Azure Storage Account using Geo-Redundant Storage (GRS) to ensure durability and regional resilience.
During creation:
-
Public blob access is explicitly disabled
-
Secure defaults are applied before data is introduced
This prevents accidental exposure later and ensures the storage account starts in a hardened state.
Why this matters:
-
Many breaches occur due to insecure defaults
-
Retrofitting security is riskier than building it in from day one
🔗 Related infrastructure patterns can be seen in:
Build a Secure Azure Environment in Minutes with Bicep: VMs, Networking, Private Endpoints & Blob Replication
Step 2: Configure a Private Blob Container
A private blob container is created within the storage account to ensure:
-
No anonymous access
-
Authentication is always required
-
Permissions are explicitly granted
This step forms the foundation of secure storage design. Even if the storage account itself is secured, containers must also be configured correctly.
Common mistake:
Engineers often assume “private by default” applies everywhere. It doesn’t.
Explicit container privacy removes ambiguity and reduces risk.
Step 3: Apply Immutable Blob Storage Policies
To support compliance, retention, and data integrity requirements, time-based immutability policies are applied.
Immutable policies ensure that blobs:
-
Cannot be deleted
-
Cannot be modified
-
Remain protected for a defined retention period
This protects against:
-
Accidental deletion
-
Malicious insider actions
-
Ransomware attacks
Immutable storage is commonly required for:
-
Financial records
-
Legal evidence
-
Audit logs
-
Regulatory compliance (e.g., SEC, FINRA, GDPR retention controls)
By automating immutability using PowerShell, these protections remain consistent across environments.
Step 4: Restrict Network Access Using VNets and Subnets
Instead of allowing public access to storage endpoints, access is restricted to a specific virtual network and subnet.
This ensures:
-
Traffic originates only from trusted Azure resources
-
Storage endpoints are isolated from the public internet
-
Zero Trust networking principles are enforced
Even if credentials are compromised, network restrictions significantly reduce the attack surface.
🔗 If you’re new to Azure networking, see:
Setting Up Clean Azure VNets, Subnets & Tagging, and
Azure Networking with PowerShell: VNet Design, Peering, VM Provisioning & Network Watcher (Beginner to Pro)
Step 5: Configure Access Using Shared Access Signatures (SAS)
Instead of using long-lived account keys, this lab uses Shared Access Signatures (SAS) to grant controlled access.
SAS tokens provide:
-
Time-limited access
-
Permission-scoped access (read, write, list)
-
Reduced blast radius if exposed
This aligns with the principle of least privilege and is essential for:
-
Applications
-
Automation jobs
-
Temporary user access
SAS tokens are ideal when:
-
Access must expire automatically
-
Full account permissions are unnecessary
-
Auditable, scoped access is required
🔗 Monitoring access activity is critical. See:
How to Set Up Azure Monitor Alerts, Action Groups, and Processing Rules (Step-by-Step Guide)
Why PowerShell Automation Matters
Using PowerShell ensures that:
-
Security configurations are repeatable
-
Environments remain consistent
-
Human error is minimized
Automation is especially important for:
-
Multi-environment deployments (dev/test/prod)
-
Compliance-driven infrastructure
-
Auditable infrastructure changes
🔗 For broader automation patterns, see:
Automating Azure Infrastructure with Bicep: A Hands-On IaC Lab Using VS Code
Key Takeaways
Secure Azure Blob Storage is not achieved by a single checkbox or setting.
True production-grade security requires layered controls, including:
-
Network isolation
-
Immutable data protection
-
Time-bound access using SAS
-
Automated enforcement using PowerShell
When combined, these controls transform Azure Blob Storage from a simple object store into a resilient, compliant, enterprise-ready platform.
Automation ensures these protections are:
-
Repeatable
-
Auditable
-
Scalable
This is how Azure storage is secured in real-world environments.
Discover more from Humble Cloud Tech
Subscribe to get the latest posts sent to your email.