How Linux Protects Itself and How Administrators Make It Safer.
Linux is famous for stability, flexibility, and power; but none of that matters if the system cannot be trusted.
This tutorial focuses on how Linux enforces security by design, not as an afterthought. Linux does not rely on antivirus tools, external scanners, or bolt‑on security products. Instead, the operating system itself is built to:
- Limit damage when failures or misconfigurations occur
- Prevent unauthorized access
- Enforce least‑privilege access
- Harden itself for real production environments
- Detect suspicious activity
- Protect remote access
- Restrict what processes can do
This is the point where learners move beyond simply running commands and begin protecting systems.
It’s where beginners start thinking like administrators.
Security is not a checklist.
Security is not a tool.
Security is a mindset.
Every Linux system is built on four pillars:
- Understanding (how Linux works internally)
- Control (users, permissions, sudo, packages, services)
- Visibility (processes, networking, monitoring)
- Reliability (storage, filesystems, mounts, capacity)
But there is a fifth pillar, one that determines whether a system survives the real world: Trust
Trust is the foundation of Linux security.
In this guide, security is not treated as a checklist or an afterthought. Instead, it answers the core questions every administrator must be able to explain:
- Who is allowed to do what on the system?
- What is permitted to run and what is not?
- What happens when something goes wrong?
- How does Linux protect itself from mistakes, attacks, or misconfigurations?
This chapter is about understanding those answers and applying them with confidence in real systems.
WHAT IS LINUX SECURITY?
Linux security is a layered model, enforced by the kernel and configured by administrators. It combines:
- User & permission controls: who can read/write/execute
- Process isolation: processes don’t share memory/state by default
- Network restrictions: inbound/outbound traffic control
- Service hardening: run with minimal privileges and capabilities
- Auditing & logging: detect misuse and investigate incidents
- Mandatory Access Control (MAC): SELinux/AppArmor policies that restrict processes even if compromised
There is no single “secure” command. Security comes from correct configuration and a mindset of limiting blast radius.
Lab: Check Your System’s Security Layers
Goal: This gives you a snapshot of:
- Identity — who you are
- Permissions — what you can access
- Firewall — what traffic is allowed
- Security modules — SELinux/AppArmor status
Run the following commands:
whoami
groups
ls -l /
sudo ufw status
getenforce 2>/dev/null || aa-status 2>/dev/null
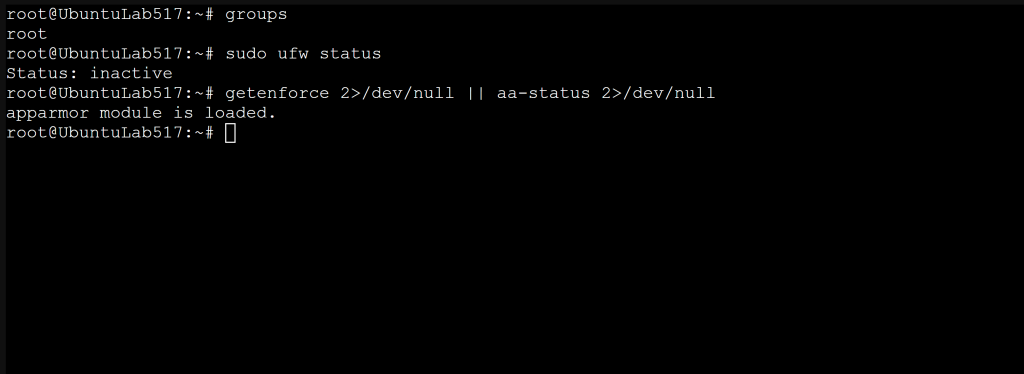
What you’ll see:
- Your user and group memberships (affects access)
- Root directory permissions (sanity check for obvious misconfigurations)
- UFW firewall status (Ubuntu/Debian)
- SELinux mode (Enforcing/Permissive/Disabled) or AppArmor profiles (Loaded/Enforced/Complain)
Verify: If SELinux/AppArmor and the firewall are both disabled, note it you’ll harden them later.
Principle of Least Privilege (Core Concept)
The most important security rule:
Every user, process, and service should have only the access it needs and nothing more.
Linux enforces least privilege with:
- Users & groups
- File permissions (r/w/x, ownership)
- sudo rules (limited elevation)
- Service isolation (systemd, chroot, containers, namespaces)
- MAC policies (SELinux/AppArmor)
Most breaches become severe breaches because least‑privilege wasn’t enforced.
Lab: Identify Users with Excessive Privileges (sudo Access)
grep 'sudo' /etc/group
getent group sudo
On RHEL‑family systems, the admin group might be wheel:
getent group wheel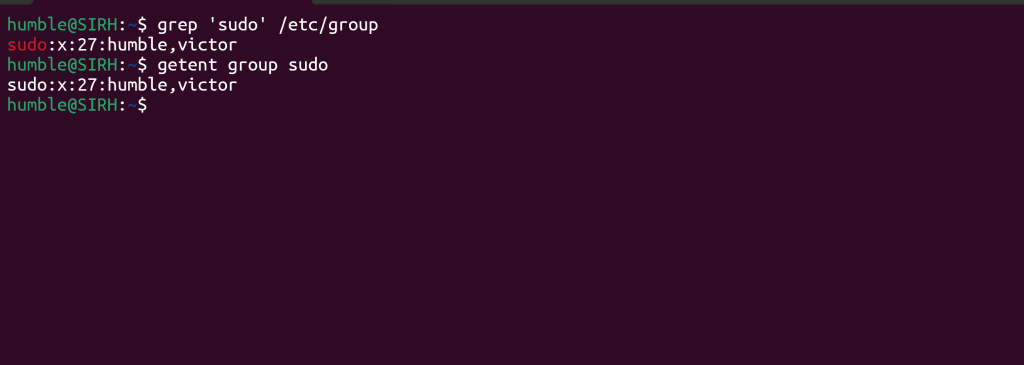
Expected: Only intended admins appear here.
Lab: Remove Unnecessary sudo Access
sudo gpasswd -d username sudo     # Debian/Ubuntu
sudo gpasswd -d wheel     # RHEL/CentOS/Fedora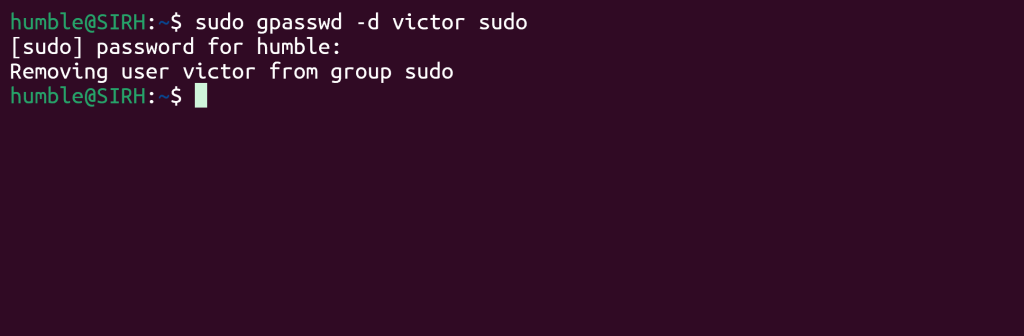
This reduces the blast radius of mistakes or compromises.
Verify:
id
sudo -l -U username 2>/dev/null || echo "No sudo privileges"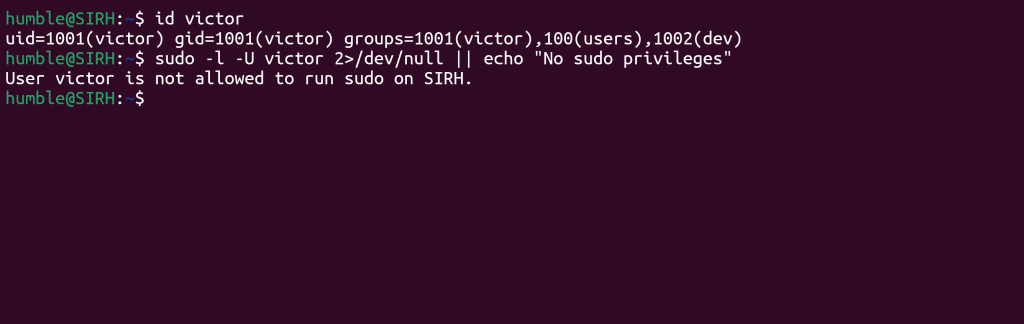
Rollback (if needed):
sudo usermod -aG sudo victor # or wheel on RHEL-family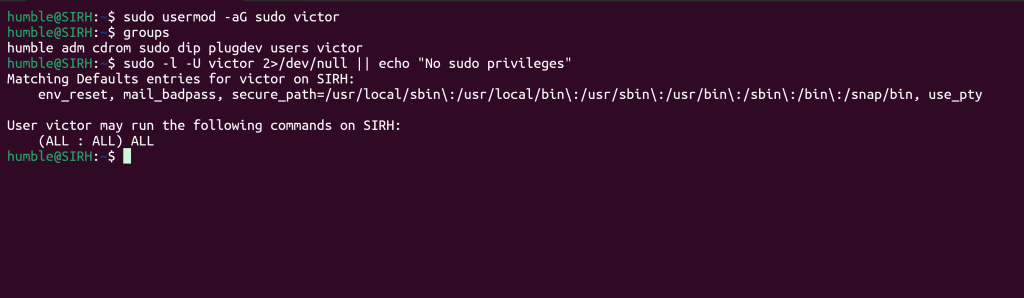
File & Directory Security
Permissions control:
- Read files (
r): Who can read files - Write/modify (
w): Who can modify them - Execute programs (
x): Who can execute programs
Critical system files are protected by:
- Root ownership
- Strict permission modes: (e.g.,
/etc/shadowis-rw-------root-only) - Limited write access for normal users
Linux assumes users will make mistakes so permissions limit damage.
Lab: Inspect Critical System File Permissions
ls -l /etc/passwd
ls -l /etc/shadow
stat /etc/passwd /etc/shadow
``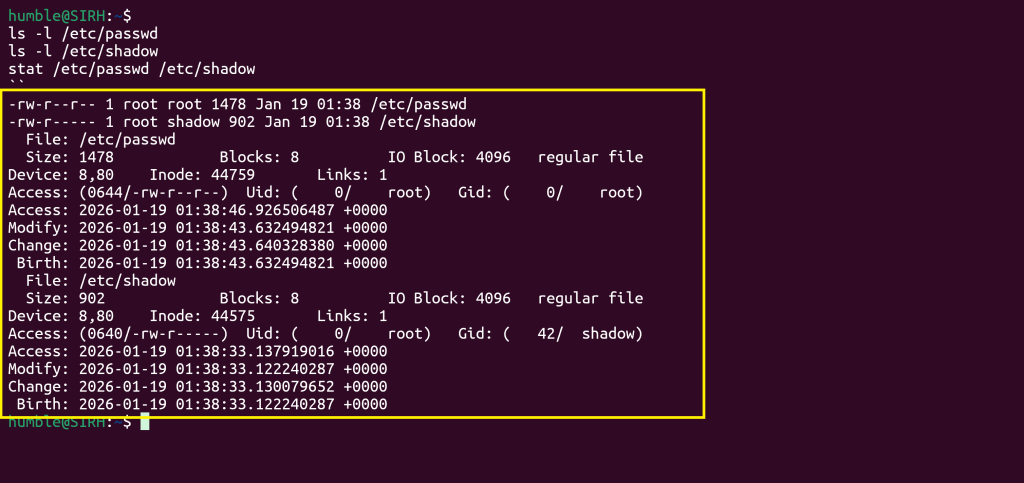
Expected:
/etc/passwd→ world‑readable but not world‑writable (needed for username lookups)/etc/shadow→ root‑only (contains password hashes)
Expected octal permissions:
/etc/passwd→ 644/etc/shadow→ 400 or 640 (depending on distro)
Lab: Harden a Sensitive File
sudo touch /root/secrets.txt #Creates an empty file that is owned by root

#print the text and writes it into the file as root then output is suppressed with >/dev/null
#This avoids permission errors you would get if tried echo > file without root
echo "TOP-SECRET" | sudo tee /root/secrets.txt >/dev/null

#This ensures the file is owned by root and prevents accidental access by other users or groups
sudo chown root:root /root/secrets.txt

#Lock down permissions - Owner: read/write, Group: no access, Others: no access
#This is the correct mode for sensitive files (same as /etc/shadow)
sudo chmod 600 /root/secrets.txt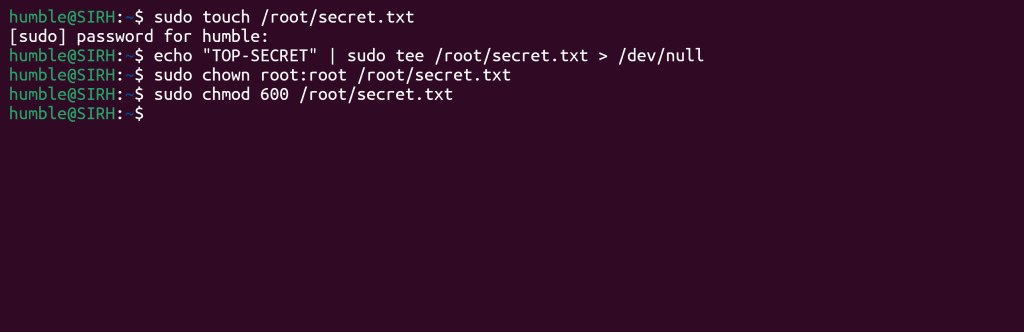
This means:
- Only root can read or modify it
- No other user can even open it
- Perfect for secrets, tokens, or lab exercises
Verify:
ls -l /root/secrets.txt
#perfect way to test file-permission hardening.
sudo -u nobody cat /root/secrets.txt || echo "Access correctly denied"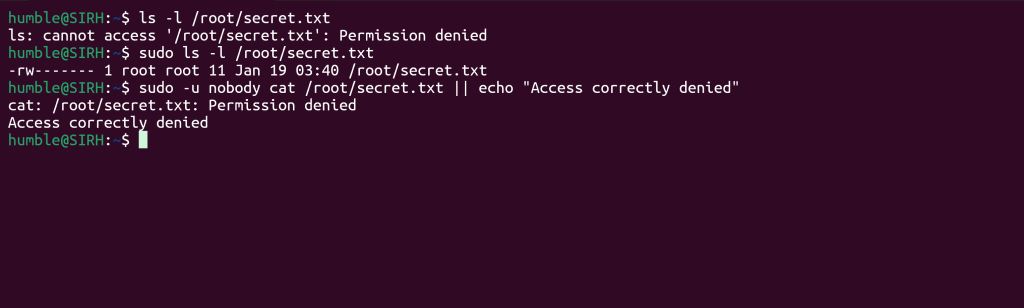
nobodyis the most restricted account on the system/rootis only accessible to root/root/secrets.txthas permissions600(root‑only)
So the read attempt
nobodyis the most restricted account on the system/rootis only accessible to root/root/secrets.txthas permissions600(root‑only)
So the read attempt must fail.
Tip: For shared project directories, consider setgid on directories to keep group ownership consistent:
#Change the group ownership - the /srv/project now belongs to the group dev
sudo chgrp dev /srv/project

#apply secure, collaborative permissions
sudo chmod 2770 /srv/project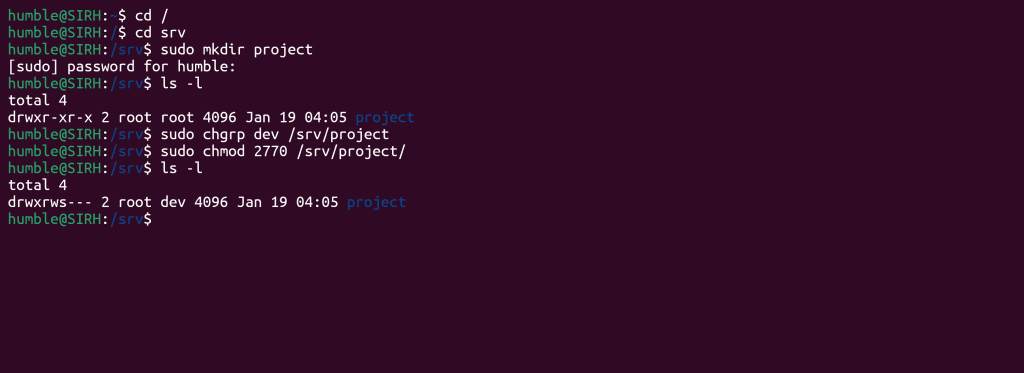
| Bit | Meaning |
|---|---|
| 2 (setgid) | New files inherit the directory’s group (dev) |
| 7 (owner) | Full access (rwx) |
| 7 (group) | Full access (rwx) |
| 0 (others) | No access |
🔐 Why this is powerful
- Every file created inside
/srv/projectautomatically belongs to the dev group - No accidental “wrong group” issues
- No outsiders can read or write
- Perfect for team collaboration, dev groups, or shared service directories
Lab: Find World‑Writable Files (Dangerous)
sudo find / -type f -perm -0002 2>/dev/nullMeaning:
/→ search the entire filesystem-type f→ only files (not directories)-perm -0002→ files that are world‑writable2>/dev/null→ hide permission‑denied errors
World‑writable files are dangerous because any user can modify them, which opens the door to:
- privilege escalation
- tampering
- malicious code injection
- log poisoning
- service hijacking
This command helps you spot them.
SSH Security: Protecting Remote Access
SSH is the most common entry point and the most targeted. Most compromises arise from weak SSH configuration, not kernel flaws.
Core SSH hardening:
- Disable root login
- Restrict which users can connect
- Restricting authentication methods
- Enforce key‑based auth (avoid password logins)
- Use firewalls to limit SSH exposure
- Log & monitor authentication attempts
Lab: Disable Root Login & Enforce Polic
sudo cp /etc/ssh/sshd_config /etc/ssh/sshd_config.bak.$(date +%F)
sudo nano /etc/ssh/sshd_config
Set or ensure:
PermitRootLogin no
PasswordAuthentication no        # if you have keys in place
PubkeyAuthentication yes
ChallengeResponseAuthentication no
UsePAM yes
LoginGraceTime 30
MaxAuthTries 3
AllowUsers victor adminuser
Test config safely:
sudo sshd -tRestart SSH (and keep your current session open in case of lockout):
sudo systemctl restart sshVerify from another terminal:
ssh victor@SERVER
ssh root@SERVER  # should be denied
Tip: If you must keep password auth temporarily, set Fail2ban or equivalent, and use strong passwords. Ultimately, move to key‑only.
Firewalls in Linux (Network Security)
- Which ports are open
- Who can connect
- Which protocols/interfaces are allowed
Common layers:
- UFW: beginner‑friendly, Ubuntu/Debian
- nftables/iptables: advanced, enterprise‑grade (RHEL, Debian, others)
Lab: UFW Quick‑Start (Ubuntu/Debian)
#Block all unsolicited inbound traffic
#This means no external system can initiate a connection to your machine unless you explicitly allow it.
sudo ufw default deny incoming

#Allow all outbound traffic
#Your system can reach the internet normally (updates, browsing, package installs).
sudo ufw default allow outgoing

#Allow SSH access
#This opens port 22 so you don’t lock yourself out if you’re using SSH.
sudo ufw allow OpenSSH

#Enable the firewall
#Activates UFW with the rules you’ve configured.
sudo ufw enable

#View the full firewall status
sudo ufw status verbose
Shows:
- Default policies
- Allowed ports
- Logging level
- IPv6 status
- Whether UFW is active
Expected output (example)
You should see something similar to:
Status: active
Logging: on (low)
Default: deny (incoming), allow (outgoing), disabled (routed)
New profiles: skip

To                         Action      From
--                         ------      ----
OpenSSH                    ALLOW       Anywhere
OpenSSH (v6)               ALLOW       Anywhere (v6)
Verify:
#Check which services are listening on ports 22, 80, 443
ss -tulpn | grep -E ':(22|80|443)\b'

#Check UFW rules with numbering
sudo ufw status numbered
Lab: nftables (Modern Backend) Minimal Policy (Advanced)
Note: Test on a VM or maintenance window.
Create a simple ruleset file:
sudo bash -c 'cat >/etc/nftables.conf' <<'EOF'
#!/usr/sbin/nft -f

flush ruleset

table inet filter {
  chain input {
    type filter hook input priority 0;
    policy drop;

    iif lo accept
    ct state established,related accept
    tcp dport 22 accept
    ip protocol icmp accept
    ip6 nexthdr icmpv6 accept
  }

  chain forward {
    type filter hook forward priority 0;
    policy drop;
  }

  chain output {
    type filter hook output priority 0;
    policy accept;
  }
}
EOF
Load & enable:
sudo nft -f /etc/nftables.conf
sudo systemctl enable --now nftables
sudo nft list ruleset
Rollback:
sudo systemctl stop nftables
sudo nft flush ruleset
Security Modules (SELinux / AppArmor)
Mandatory Access Control (MAC) adds a kernel‑enforced policy layer that limits what processes can access, even if they’re compromised.
- SELinux (RHEL/CentOS/Fedora)
- AppArmor (Ubuntu/Debian)
They prevent lateral movement and unauthorized resource access.
Lab: Check Enforcement Mode
SELinux:
getenforce # Enforcing | Permissive | Disabledsestatus # detailed view (if installed)AppArmor:
sudo aa-status
sudo aa-status | sed -n '1,20p'
Best practice: Aim for Enforcing (SELinux) or profiles in enforce (AppArmor) in production.
Lab: Review & Resolve Denials
SELinux:
sudo journalctl -t setroubleshoot --since "1 hour ago" 2>/dev/null | tail
sudo ausearch -m AVC,USER_AVC -ts recent 2>/dev/null | aureport -av
AppArmor:
sudo dmesg | grep -i apparmor | tail -n 50
sudo aa-logprof # step through suggestions interactively
Tip: If you must switch SELinux to permissive while tuning:
sudo setenforce 0 # temporary (runtime)# Re-enable to test:sudo setenforce 1Do not leave MAC permanently disabled without a documented reason.
Logging & Auditing (Detection)
Linux logs include:
- Authentication (
/var/log/auth.log,/var/log/secure) - Systemd journal (
journalctl) - Kernel warnings and denials
- Audit logs (if
auditdenabled) - Service logs (Nginx, SSH, DBs, etc.)
Lab: View Authentication & System Logs
Debian/Ubuntu:
sudo tail -n 100 /var/log/auth.logsudo journalctl -xeRHEL/CentOS/Fedora:
sudo tail -n 100 /var/log/securesudo journalctl -xeLab: Monitor Logs in Real Time
sudo tail -f /var/log/syslog # Debian/Ubuntu
sudo tail -f /var/log/messages # RHEL-family
Lab: Quick Auditd Peek (If Enabled)
sudo ausearch -m USER_AUTH,USER_LOGIN -ts today | aureport -auAction: Create a habit of reviewing failed logins, sudo attempts, and service errors. Set alerts where possible.
Takeaway: Security Assumes Failure
- Users will make mistakes.
- Services will crash.
- Attackers will try things.
- Misconfigurations will happen.
Linux is built to limit damage by design. Administrators make it safer by:
- Enforcing least privilege
- Hardening SSH
- Applying host firewalls
- Enabling SELinux/AppArmor
- Securing files and services
- Monitoring logs and audits
This tutorial provides you with the mindset and hands-on skills to protect real systems, not just operate them.
Appendix: Recommended Hardening Checklist (Quick Reference)
- Remove unnecessary sudo rights; review
sudoersregularly - Enforce key‑based SSH; disable root login; reduce
MaxAuthTries - Restrict SSH to specific users or groups (
AllowUsers/AllowGroups) - Enable firewall (UFW or nftables); default deny inbound
- Keep SELinux/AppArmor enforcing; resolve denials properly
- Lock critical file permissions; use
600/640where appropriate - Rotate and monitor logs; set alerts for failures & anomalies
- Minimize services; disable or mask unused daemons
- Patch regularly; automate updates with maintenance windows
- Document configurations and rollback procedures
Environment & Prerequisites (for Labs)
- A Linux VM or server (Ubuntu 20.04+/22.04+, Debian 11+, RHEL/CentOS 8+/Stream, Fedora 38+)
- A non‑root user with
sudoprivileges - A terminal with network access
- SSH keys set up before disabling password authentication
- Snapshot/backup recommended before firewall/MAC changes
Discover more from Humble Cloud Tech
Subscribe to get the latest posts sent to your email.